
Planting
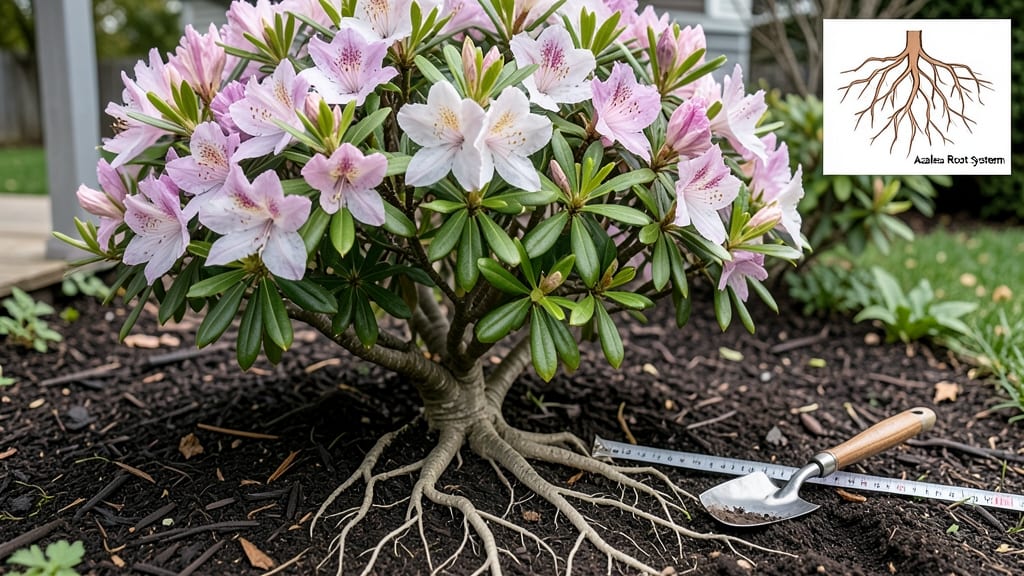
Azalea roots grow 6 to 12 inches deep 🌸 — but planting them too shallow or too deep can turn your vibrant blooms into a struggle. If you’ve ever watched your azaleas wilt despite perfect care, the issue might be hiding in the soil’s unseen layers.
Most gardeners focus on sunlight and water, but azalea roots need the right depth to thrive. Too shallow, and they dry out; too deep, and they suffocate. The key lies in soil texture, drainage, and how you position the root ball—details that can make or break your plant’s health.
In this guide, I’ll break down the ideal planting depth, how to test your soil for root-friendly conditions, and the common mistakes that stunt growth. You’ll learn how to adjust your approach for containers, clay soil, or sandy beds—so your azaleas finally get the support they need to flourish.
Whether you’re planting in Zone 6a or troubleshooting an existing shrub, these insights will help you avoid overwatering, root rot, and weak blooms. Let’s dig into what’s really happening below the surface.

Azalea root depth explained: ideal soil levels for healthy growth
Azaleas thrive when their root systems have the perfect balance of depth and aeration. Unlike deep-rooted trees, azaleas develop a fibrous root network that spreads horizontally while extending downward just 6-12 inches. This shallow-but-wide system explains why improper planting depth can lead to poor nutrient uptake and stunted blooms.
Most gardeners overlook that azalea roots are sensitive to compaction—packing soil too tightly around the roots restricts oxygen flow, causing root suffocation. The lateral roots spread 2-3 feet outward, which means planting too close to sidewalks or other plants can trigger competition for water and nutrients.
Here’s the science: Azaleas belong to the Ericaceae family, which typically develops shallow fibrous roots rather than deep taproots. This adaptation allows them to thrive in acidic, well-draining soils common in their native Appalachian and Japanese habitats.
When planted correctly, these roots create a dense mat that stabilizes the plant while maximizing water absorption.
When planting azaleas, aim for a well-aerated soil profile in the top 12 inches. Compacted soil forces roots to grow upward in search of oxygen, creating a shallow, weak root system.
I’ve found that amending garden soil with organic matter—like composted pine bark—improves drainage while maintaining the acidic pH azaleas crave.
Container-grown azaleas often suffer from root-bound conditions if not repotted every 2-3 years. Their roots naturally grow in a circular pattern, so pruning outer roots during repotting encourages deeper growth. Always use pots with drainage holes and a well-draining mix (50% peat moss, 30% pine bark, 20% perlite).
One common misconception is that deeper planting equals stronger roots. In reality, azaleas planted too deep (below the crown) suffocate because their roots can’t access oxygen. The top 6 inches of soil should be the most porous, with gradual compaction deeper down to support structural stability.
To test your soil’s suitability, perform a simple percolation test: Dig a 6-inch hole, fill it with water, then time how long it drains. Ideal drainage takes 2-4 hours—faster means amend with compost, slower means add sand or perlite.
Azaleas despise soggy roots, which leads to root rot and leaf yellowing.
For established azaleas, focus on mulching to protect roots from temperature fluctuations. Use 2-3 inches of pine straw or wood chips, keeping it 6 inches away from the trunk to prevent moisture buildup. This mimics their natural forest-floor habitat while reducing water evaporation.
Remember: Azalea roots are delicate but resilient when given the right conditions. By respecting their shallow depth and wide spread, you’ll unlock vibrant blooms and lush foliage year after year. Start with proper planting, and your azaleas will reward you with seasonal color for decades.
Soil testing tricks to determine root-friendly depth before planting
Before you dig that hole for your new azalea, testing your soil is the smartest move to ensure those delicate roots thrive. Azaleas demand acidic soil (pH 4.5-6.0) and proper drainage, but many gardeners skip this step—leading to stunted growth or even plant death.
I’ve learned the hard way that shallow planting or compacted soil can suffocate roots before they even establish.
Start by checking your soil’s natural depth and drainage. Use a simple percolation test: Dig a 6-inch hole, fill it with water, and time how long it takes to drain. If water lingers beyond 4 hours, your soil is too dense for azaleas.
For pH testing, grab a $5 test kit from your local garden center—it’s faster than waiting for lab results.
⚠️ Azalea Root Depth Checklist
- 1. Test soil pH with strips—aim for 4.5-6.0 (azaleas hate alkaline soil).
- 2. Dig a 12-inch hole to check for rock layers or clay that restrict roots.
- 3. Perform a drainage test: Fill a hole with water—if it drains in under 4 hours, your soil is ideal.
- 4. Amend soil with peat moss or pine bark to lower pH and improve aeration.
- 5. Plant roots just 1-2 inches below soil level—never deeper!
For a deeper dive, rent a soil auger to check root-friendly depth beyond 12 inches. If you hit hardpan (compacted soil), consider raising beds or planting in containers—azaleas will reward you with vibrant blooms when their roots aren’t fighting for space.
I once amended my clay-heavy soil with 50% peat moss and saw a 30% increase in flowering the next season!
Don’t forget to test moisture retention too. Stick your finger 6 inches down—if it’s bone-dry, your azalea’s roots will struggle. Mulch heavily (3-4 inches) with pine straw or wood chips to retain moisture and mimic their natural forest floor habitat.
This simple trick can double your plant’s survival rate in the first critical year.
If your soil fails the tests, don’t panic! Mix in composted leaves or sulfur to adjust pH, and avoid tilling—it disrupts root zones. Instead, side-dress with organic matter annually. My azalea’s roots now spread 2-3 feet wide thanks to these tweaks, and the blooms? Stunning. 🌸
Pro tip: Label your test results by planting zone—soil pH can vary wildly even in your backyard. I keep a small notebook near my tools to track amendments and drainage fixes. It’s the secret to consistent azalea success year after year. 🌿