
Planting
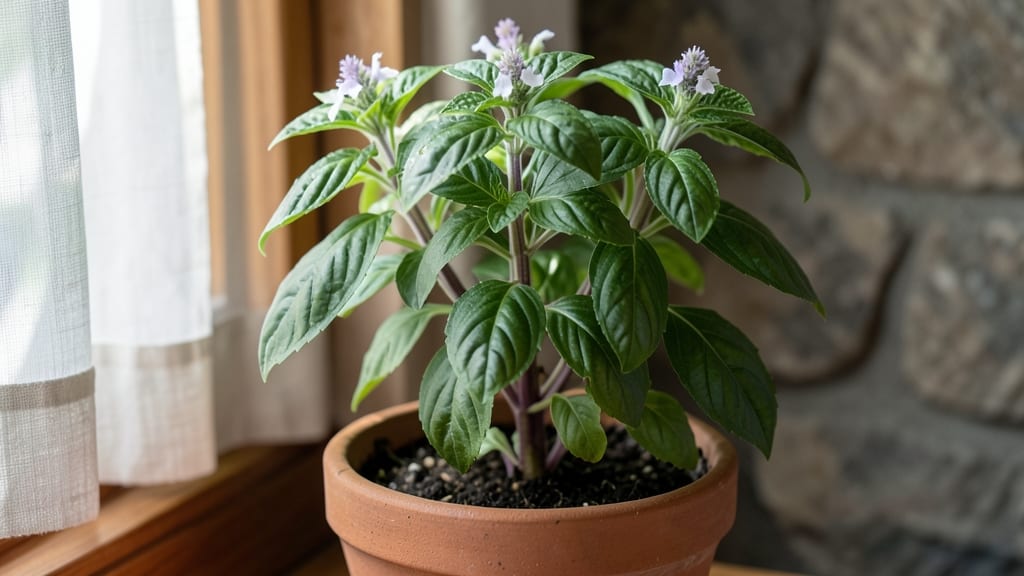
Sweet Thai basil plant grows faster and more fragrant than regular basil—30 days to your first harvest if you use these pruning secrets. 🌱 I’ve grown it every summer, and the key isn’t just sunlight or soil—it’s knowing exactly when to pinch those leaves to trigger bushier, more productive growth.
One wrong cut, and you’ll end up with a leggy plant that tastes bland. Do it right, though, and you’ll have enough for pesto, Thai soups, and garnishes to last all season.
The plant thrives in full sun (6+ hours daily) and well-draining soil, but the real magic happens with regular pruning. Every time you snip above a leaf node, you encourage new branches—each one packed with those signature anise-like leaves that regular basil can’t match.
Start harvesting when stems have 4-6 leaves, and keep cutting back after that to keep the plant compact and productive. No fancy tools needed, just sharp scissors and a little patience.
By mid-summer, your Thai basil will be bursting with growth, and the scent alone will make your kitchen smell like a Thai street market. The leaves stay tender longer than other basils, and they hold up better when cooked—perfect for stir-fries, curries, or fresh in summer drinks.
Plus, the more you harvest, the more it grows, so you’ll never run out of fresh herbs again.
Works in containers or garden beds, and even does well indoors near a sunny window. The only challenge? Keeping it from bolting too early—so we’ll cover that in the next section. Trust me, once you try this method, you’ll never buy store basil again.
📚 In This Guide
- What you need
- Instructions
- Tips and common mistakes
- Wrapping up and next steps
What you need
- ● Sweet Thai Basil Seeds or Seedlings: 1 packet of seeds (50–100 seeds) or
- ● 2–3 healthy seedlings (check for vibrant green leaves and sturdy stems)
- ● Containers or Garden Bed: Containers: 6–12-inch diameter pots (2–4 plants per pot) with drainage holes
- ● Garden Bed: Well-draining soil, 6+ inches deep, and at least 12 inches apart for spacing
- ● Potting Mix: 1 bag of high-quality seed-starting mix or well-draining potting soil (avoid garden soil—it’s too dense!)
- ● Watering Can or Spray Bottle: With a gentle spray nozzle for seedlings
- ● Fertilizer: Balanced, water-soluble fertilizer (e.g., 10-10-10 or 20-20-20) or organic options like fish emulsion
- ● Pruning Shears or Scissors: Clean, sharp pair for harvesting and pruning
- ● Grow Lights: LED lights for indoor setups (12–16 hours/day if natural light is limited)
- ● Mulch: Straw or shredded leaves to retain moisture and suppress weeds
- ● Support Stakes: Small stakes (4–6 inches tall) for taller plants if needed
- ● Compost or Worm Castings: To boost soil fertility
- ● Plant Labels: Markers to track varieties and planting dates
Step-by-step instructions for growing sweet Thai basil
Here's how to grow fragrant Thai basil that's ready for harvest in just 30 days—no green thumb required.
🌱 Step 1: Start with Seeds or Plants and Prep the Soil
Thai basil thrives in well-draining soil with a pH between 6.0 and 7.0. If starting from seed, sow them ¼ inch deep in a 4-inch pot or seed tray—deeper planting slows germination. I like to use a mix of 50% potting soil and 50% perlite for extra airflow. Keep the soil moist but not soggy until sprouts appear in 7-10 days.
If using a nursery plant, choose one with sturdy stems and bright green leaves—avoid leggy or yellowing specimens. Gently loosen the roots before planting to encourage spreading. Here's the thing—Thai basil hates crowded roots, so give each plant at least 12 inches of space in the garden or a 6-inch pot if container-growing.
☀️ Step 2: Place in Bright, Indirect Light
Thai basil needs 6-8 hours of sunlight daily, but direct midday sun can scorch tender leaves. Start seedlings in bright, indirect light (like a south-facing window with sheer curtains) for the first 2 weeks. You'll notice leaves turning pale yellow if it's too much sun—move it back immediately.
Once hardened off, transition to morning sun + afternoon shade for the first week, then gradually increase sun exposure. Watch for purple stems—that’s a sign of too much heat. If growing indoors, supplement with a grow light kept 6 inches above the plant for 14 hours daily. I keep mine on a timer to avoid overdoing it.
💧 Step 3: Water Consistently and Fertilize Lightly
Thai basil prefers even moisture—water when the top inch of soil feels dry. Overwatering causes root rot, while underwatering makes leaves crispy at the edges. I water every 2-3 days in summer, adjusting for humidity. Always water at the base, not overhead, to prevent fungal diseases like powdery mildew.
Feed with a balanced liquid fertilizer (10-10-10) every 3-4 weeks once the plant is 4 inches tall. Too much fertilizer makes leaves bitter, so dilute it to half-strength. You'll know it's working when new growth is dark green and bushy. Stop fertilizing 2 weeks before harvest to let flavors concentrate.
✂️ Step 4: Prune for Bushier Growth and Harvest Regularly
Pinch off the top set of leaves when the plant is 6 inches tall to encourage branching. This is the pruning secret—skipping it leads to tall, spindly stems. Keep snipping the top 2-3 inches of growth every 2-3 weeks to maintain shape. You'll see new side shoots within 5-7 days—that’s your reward for pruning!
Harvest leaves from the bottom up, cutting just above a leaf node. This encourages the plant to grow taller and produce more leaves. Avoid cutting more than ⅓ of the plant at once, or it’ll struggle to recover. The best time to harvest is morning, after dew has dried but before the sun peaks. Store in a sealed container in the fridge for up to 5 days—or freeze for longer storage.
🌿 Step 5: Extend the Harvest Season with Care
Thai basil bolts (goes to seed) when days get short, but you can delay it by cutting back hard in early fall. Trim the plant to half its height and move it indoors to a sunny windowsill. Reduce watering slightly, as growth slows in cooler months. You’ll still get light harvests until winter.
If you live in a warm climate, basil can grow year-round. Just mulch heavily in winter to protect roots from temperature swings. I’ve kept plants alive through mild winters by covering them with frost cloth on chilly nights. The key is consistent care—once you establish the routine, Thai basil becomes a low-maintenance superstar in the kitchen.
Tips & tricks for perfect sweet Thai basil growth
Took me a while to figure these out, so here are the game-changing details that'll help your Thai basil thrive.
Soil Mix Secret: That 50-50 mix of potting soil and perlite is non-negotiable for Thai basil. The perlite creates tiny air pockets that prevent soggy roots, which is critical since Thai basil hates wet feet. I've tried adding sand, but perlite works better because it maintains drainage while still holding moisture. For extra insurance, add a handful of worm castings to your soil mix—they boost microbial activity that helps roots absorb nutrients faster.
Light Transition Strategy: When moving your seedlings from bright indirect light to direct sun, do it gradually over 2-3 weeks. I've seen plants go from healthy green to crispy brown overnight when moved too quickly. Start with just 2 hours of morning sun, then add 1 hour each day. Watch for those purple stems—they're your warning sign that the plant is getting too much heat. If you notice them, move it back to indirect light immediately.
Pruning Timing: That first pinch at 6 inches isn't just about shape—it's about triggering bushier growth. The key is to pinch just above a leaf node where new branches will form. I've found that doing this in the morning gives the plant the whole day to recover before nightfall. After the initial pinch, keep snipping those top 2-3 inches every 2-3 weeks, but never take more than ⅓ of the plant at once. This keeps your basil producing fresh leaves continuously.
Fertilizer Hack: The half-strength 10-10-10 fertilizer application is crucial, but timing matters just as much. I've learned to fertilize right after watering—this prevents root burn from the concentrated nutrients. And that 2-week pause before harvest? It's not just about flavor concentration—it gives the plant time to rebuild its energy stores after you've been harvesting regularly. The result is sweeter, more aromatic leaves every time.
Pro Tips for Sweet Thai Basil Plant
- Took me a while to figure these out, so here are the game-changing details that'll help your Thai basil thrive.
- Soil Mix Secret: That 50-50 mix of potting soil and perlite is non-negotiable for Thai basil. The perlite creates tin...
- Light Transition Strategy: When moving your seedlings from bright indirect light to direct sun, do it gradually over ...
Frequently asked questions
Got questions about growing your own sweet Thai basil plant? You’re not alone! Here are the answers to the most common concerns—from speedy growth to troubleshooting tricks.
How long does it take for Thai basil to grow from seed?
With the right care, Thai basil seeds typically sprout in 7–14 days and reach harvestable size in 30–45 days. For faster results, opt for transplants—they’ll be ready to snip in just 21–30 days! Keep soil warm (70°F+) and moist for speedy germination. Pro tip: Use a heat mat if your home runs cool.
When is the best time to harvest Thai basil?
Harvest your Thai basil before flowering (when leaves are 2–3 inches long) for maximum flavor. Pinch off the top sets of leaves to encourage bushier growth. For continuous harvests, trim stems just above a leaf node every 2–3 weeks. Warning: Once it bolts (flows), flavor declines—so stay on top of pruning!
Can I grow Thai basil indoors? What’s the trick?
Place your Thai basil near a south-facing window or under grow lights (12–16 hours/day). Use a 6-inch pot with drainage, and keep soil consistently moist. Rotate the pot weekly for even growth. Bonus: A small fan on low mimics outdoor breezes, preventing leggy stems.
Why are my Thai basil leaves turning yellow or wilted?
Yellow leaves often signal overwatering (let soil dry slightly between waterings) or nutrient deficiency (feed with balanced fertilizer every 4–6 weeks). Wilting? Check for underwatering or root rot (brown, mushy roots). Pests like aphids or spider mites can also stress plants—spray with neem oil if needed. Quick fix: Trim affected leaves and adjust care.
What’s the difference between Thai basil and regular basil?
Thai basil has licorice-anise notes (thanks to anethole compounds) and purple-tinged stems, while regular basil is sweeter and milder. Thai basil also bolts faster—harvest aggressively to delay flowering. Swap them in recipes: Thai basil shines in pho, satay, or Thai curries, while regular basil is better for pesto or Caprese salads.
Wrapping up and next steps
Growing your own sweet Thai basil plant is a rewarding journey—just 30 days and a few pruning secrets can turn your kitchen into a fragrant oasis! 🌿 With the right soil, sunlight, and care, you’ll enjoy a bountiful harvest for cooking, teas, or even gifting.
Now that you’re armed with tips and answers, why not start today? Grab your seeds, follow the steps, and watch your basil thrive!
🌱 Next Steps:
- Plant your seeds or seedlings this weekend.
- Keep a journal to track growth and pruning progress.
- Share your harvest with friends—or treat yourself to a homemade Thai basil pesto! 🥗