
Planting
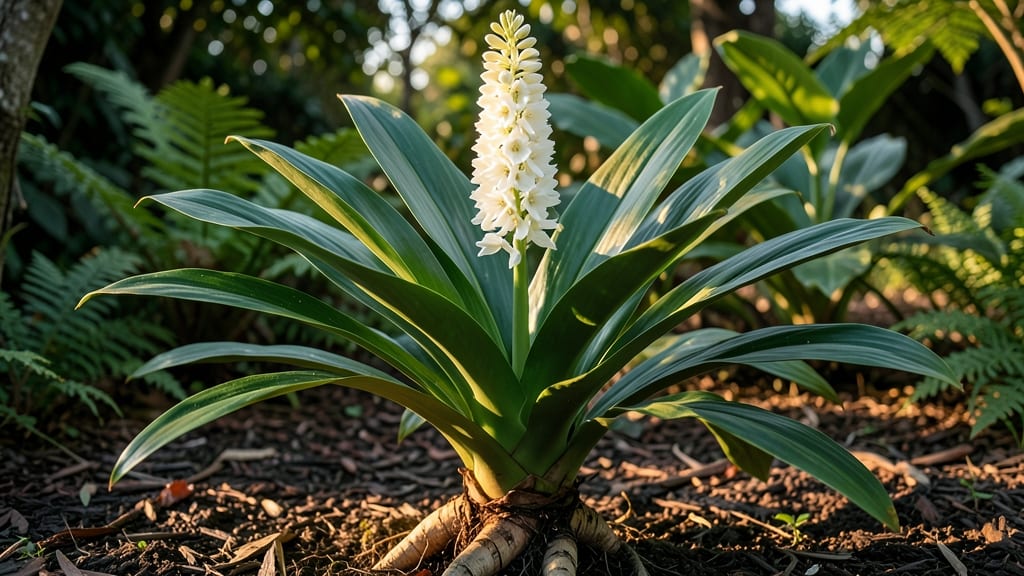
Growing the Siam ginger plant in containers means bold purple foliage and fragrant blooms—even in small spaces. 🌿 I’ve watched mine transform from a modest clump to a lush, tropical centerpiece in just two seasons, and the secret lies in mimicking its native rainforest conditions.
This isn’t your typical houseplant; it’s a statement piece that thrives with the right balance of light, water, and humidity.
The key to success starts with the container—choose something with drainage holes and room to grow, since Siam ginger’s rhizomes spread eagerly. A well-draining potting mix (equal parts peat, perlite, and compost) keeps roots happy, while morning sun and afternoon shade prevent scorched leaves.
My plant now stands 3-4 feet tall and produces stunning purple bracts that last for weeks, proving it’s worth the effort.
Watering is where most people stumble: keep the soil consistently moist but never soggy. A spray bottle keeps humidity high, and a monthly dose of balanced fertilizer (10-10-10) encourages those dramatic blooms.
Prune yellow or damaged leaves to redirect energy, and you’ll reward yourself with a plant that looks like it belongs in a conservatory—no greenhouse required.
Even in cooler months, Siam ginger stays vibrant with a little care. Move it indoors near a bright window if temperatures dip below 50°F, and avoid drafts.
The payoff? A plant that grows back stronger each year, with fewer pests and more blooms. Ready to make yours the envy of the neighborhood?
📚 In This Guide
- What you need
- Instructions
- Tips and common mistakes
- Wrapping up and next steps
What you need
- ● Siam Ginger Plant: 1 healthy nursery-grown rhizome or potted plant (ensure it has vibrant purple stems and glossy leaves).
- ● Container: 1 12-inch or larger pot (with drainage holes) for indoor growing.
- ● 1 18-inch+ container (with drainage) for outdoor planting or larger indoor setups.
- ○ Optional: Decorative cache pot (1-2 inches larger than the primary pot) for a polished look.
- ● High-Quality Potting Mix: 1 bag (5-10 quarts) of well-draining, peat-based mix (e.g., African violet or tropical plant mix). Mix in: 20% perlite or pumice
- ● 10% orchid bark (for aeration)
- ● Drainage Medium: 1-2 inches of gravel, pebbles, or broken terracotta (for the bottom of the pot).
- ● Fertilizer: 1 bottle of balanced liquid fertilizer (10-10-10 or 20-20-20, diluted to half-strength).
- ○ Optional: Slow-release granular fertilizer (e.g., Osmocote) for convenience.
- ● Watering Can or Spray Bottle: With a rose nozzle for gentle watering.
- ● Pruning Shears: Sharp, sterilized shears (for trimming dead leaves or leggy growth).
- ○ Support (Optional): 1-2 bamboo stakes or trellis (if your plant grows tall and needs support).
- ● Soft gardening twine (for securing stems).
- ● Location: A spot with bright, indirect light (e.g., near an east or north-facing window, or under a grow light for 6-8 hours/day).
- ● Humidity: Aim for 50-70% humidity. Use a humidifier or place the pot on a pebble tray with water if your air is dry. 💡
- ● Temperature: Keep between 65–85°F (18–30°C). Avoid drafts or cold windowsills!
- ● Patience: Siam Ginger grows slowly but rewards you with stunning foliage over time.
Step-by-Step guide to growing Siam ginger in containers
Here's how to cultivate this striking tropical beauty—bold leaves and all—without a greenhouse.
🪴 Step 1: Select the Right Container and Soil Mix
Choose a pot with drainage holes that's at least 12 inches wide and deep enough to accommodate the rhizome's spread. Siam ginger thrives in well-draining, slightly acidic soil—I mix equal parts potting mix, perlite, and peat moss to create the perfect airy medium. This prevents root rot while keeping moisture consistent.
Fill the container 2/3 full with your mix, then tap gently to settle it. The rhizome (thick, knobby root) needs to sit just below the soil surface—never bury it completely. This ensures new shoots emerge easily. I always label my pots because Siam ginger's foliage can look similar to other tropical plants until it matures.
🌱 Step 2: Plant the Rhizome Correctly
Place the rhizome horizontally in the pot, with the buds or "eyes" facing upward. These are the points where new growth will sprout. Gently cover it with 1-2 inches of soil, leaving the top third exposed. Press lightly to secure it—you want the rhizome stable but not buried deeper than 2 inches.
Water immediately after planting, letting the soil absorb moisture until it's damp 2 inches deep. Siam ginger hates soggy conditions, but it also won't tolerate dryness at this stage. I use a spray bottle to mist the leaves lightly, as they're sensitive to heavy water droplets. Place the pot in a bright, indirect light spot for the first week to reduce stress.
☀️ Step 3: Provide Ideal Light and Humidity
Siam ginger craves bright, indirect light—think east or west-facing windows or a spot under a sheer curtain. Direct sun will scorch its large, velvety leaves, while too little light causes leggy growth. You'll know it's happy when leaves stay deep green with purple undersides and new shoots emerge within 4-6 weeks.
Maintain 60-75% humidity by grouping pots together or placing the container on a tray filled with pebbles and water. Mist the leaves 2-3 times weekly to mimic its tropical habitat. If your home is dry, consider a small humidifier nearby—drooping leaves signal thirst, but crispy edges mean too much moisture.
💧 Step 4: Water and Fertilize for Lush Growth
Water when the top 2 inches of soil feel dry to the touch. Stick your finger in—if it's damp below that, wait a day. Siam ginger stores water in its rhizome, so it's drought-tolerant once established, but young plants need consistent moisture. I water deeply until it drains from the bottom, then empty the saucer to prevent root rot.
Feed every 4-6 weeks during spring and summer with a balanced liquid fertilizer (10-10-10). Reduce feeding in fall and winter, as growth slows. Yellowing leaves often mean over-fertilizing—rinse the soil lightly if this happens. Prune leggy stems to encourage bushier growth, cutting just above a leaf node with sterilized scissors.
✂️ Step 5: Overwinter and Propagate
As temperatures drop below 50°F, move your Siam ginger indoors near a south-facing window or under grow lights. Reduce watering to every 2-3 weeks, letting the soil dry slightly between waterings. The plant enters dormancy, and growth slows dramatically—this is normal. Check for pests like spider mites, which thrive in dry conditions.
Propagate by dividing the rhizome in early spring when new shoots appear. Gently remove the plant, separate the sections (each with at least one bud), and replant in fresh soil. This keeps your collection thriving while sharing plants with fellow gardeners. With proper care, your Siam ginger will reward you with bold, tropical foliage year-round.
Tips & tricks for growing stunning Siam ginger in containers
Here's what I wish I'd known before my first attempt—these details make all the difference with this dramatic tropical plant.
Container Selection: While the instructions specify a 12-inch pot, I always go one size up—14 inches—when possible. Siam ginger spreads aggressively, and the extra space gives those bold leaves room to flourish without becoming crowded. If you're using a larger container, just reduce the soil volume to maintain that 2/3 full guideline to prevent waterlogging.
Soil Mix Secret: That equal-parts mix of potting soil, perlite, and peat moss is non-negotiable, but here's my upgrade: I add 1/4 cup of worm castings to the mix. This gives your plant a gentle nutrient boost right from planting while maintaining that perfect airy texture. Just stir it in before filling your container.
Rhizome Positioning: In Step 2, when planting that knobby rhizome, I make sure to angle it slightly—about 15 degrees—rather than placing it flat. This subtle tilt encourages more vigorous growth from multiple buds rather than just the top ones. Just keep those buds facing upward as instructed.
Light Troubleshooting: If you notice your Siam ginger developing long, leggy stems after those 4-6 weeks (the expected timeframe for new shoots), it's getting too little light. Move it closer to your brightest window or consider a grow light for 12-14 hours daily. The purple undersides of leaves will darken as it adjusts to better conditions.
Pro Tips for Siam Ginger Plant
- Here's what I wish I'd known before my first attempt—these details make all the difference with this dramatic tropica...
- Container Selection: While the instructions specify a 12-inch pot, I always go one size up—14 inches—when possible. S...
- Soil Mix Secret: That equal-parts mix of potting soil, perlite, and peat moss is non-negotiable, but here's my upgrad...
Frequently asked questions
Got questions about growing your Siam ginger (Alpinia purpurata)? You’re not alone!
Here are answers to the most common queries from fellow plant parents—because even tropical beauties need a little TLC.
How fast does Siam ginger grow, and how big will it get in a container?
Siam ginger is a fast grower—expect 1–2 feet of height and spread per year! In containers, it typically stays between 3–5 feet tall and 2–3 feet wide, but pruning keeps it manageable. Use a 12–18-inch pot for dwarf varieties and 20+ inches for standard types to prevent root-bound stress.
When is the best time to plant Siam ginger outdoors?
Wait until after the last frost (spring) when soil temps hit 60°F+—this plant hates cold! In warmer zones (USDA 9–11), plant in early spring; in cooler areas, start indoors 8–10 weeks before the last frost or grow it as a container tropical year-round. Pro tip: Use a heat mat if starting seeds indoors!
Why are my Siam ginger leaves turning yellow or brown?
Yellowing leaves often signal overwatering (check soil moisture—it should dry 2–3 inches deep between waterings), while brown edges usually mean underwatering or low humidity. Fix it: Adjust watering, mist leaves, or place a pebble tray nearby. Bonus: Brown tips can also mean fluoride buildup—use rainwater or distilled water if your tap water is hard.
Can I grow Siam ginger from a store-bought plant, or do I need seeds?
Yes! Division is easiest—gently remove the plant from its pot, separate the clumps (each should have roots and shoots), and replant. For seeds, it’s slower but rewarding—soak seeds overnight, plant in moist soil, and keep warm (70–80°F). Warning: Store-bought plants may be sterile hybrids, so division ensures identical foliage!
Is Siam ginger safe for pets, and what’s the best way to keep pests away?
Great news: Siam ginger is non-toxic to cats and dogs! For pests, aphids and mealybugs are the main culprits. Prevent them: Spray leaves with neem oil or introduce ladybugs. Keep your plant well-ventilated and avoid overcrowding. Quick fix: Wipe leaves with soapy water (1 tsp mild soap per gallon) to deter early infestations.
Wrapping up and next steps
The Siam ginger plant is a stunning, low-maintenance tropical beauty that brings bold foliage and vibrant energy to any space—even small containers! With its striking leaves and adaptable nature, it’s perfect for plant parents of all levels.
Whether you’re drawn to its dramatic foliage or its resilience, this plant is a game-changer for indoor greenery.
Ready to level up your plant collection? Start by picking your pot, gathering supplies, and giving this tropical stunner the care it deserves. Your future jungle vibes await! 🌿✨