
Planting
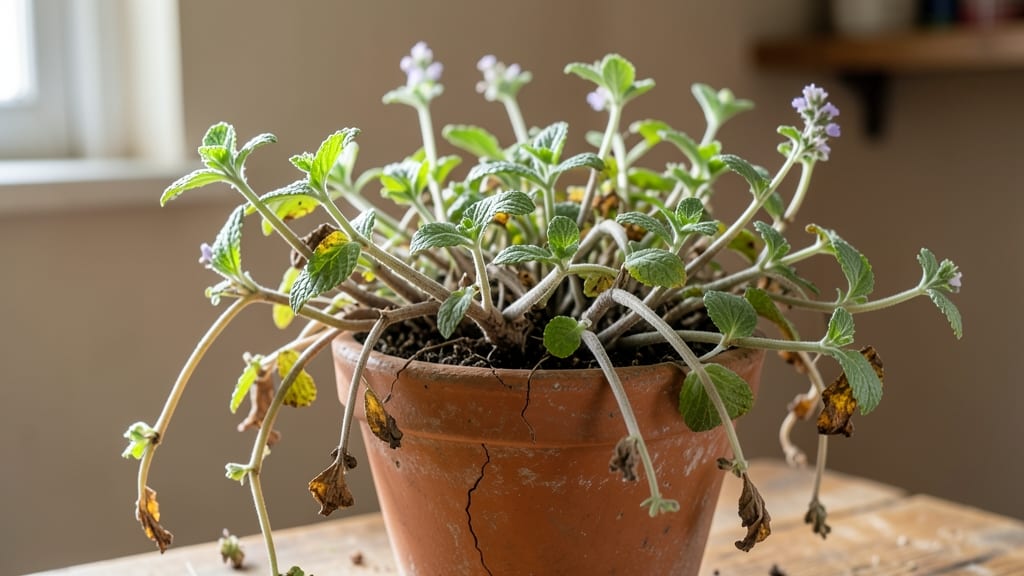
Your scraggly mint plant isn’t beyond saving—it just needs a strategic haircut. 🌿 I’ve nursed back more than my share of leggy, sparse mint bushes, and the secret isn’t complicated: targeted pruning, better light, and a little patience.
Most gardeners overlook how aggressively mint responds to cutting, but this 3-step trim brings it back to thick, vibrant growth in weeks.
The first step is cutting back one-third of the plant right above leaf nodes, which forces new shoots to sprout from the base. Use clean shears to avoid tearing stems, and don’t toss those clippings—steep them in water for fresh mint tea while the plant recovers.
After trimming, move your plant to 4-6 hours of morning sun (mint tolerates shade but stretches without enough light).
Within 2-3 weeks, you’ll see fresh green shoots pushing through, and the plant will fill out faster than you expect. The key is consistency: repeat the trim every 4-6 weeks during growing season, and fertilize lightly with a balanced 10-10-10 mix every 6 weeks.
Your mint will go from scraggly to bushy and productive—ready for pesto, teas, or mojitos.
For long-term success, keep mint in a well-draining container (it spreads aggressively in garden beds) and pinch back flowers before they form—this redirects energy to leaves instead of seeds.
If your plant still looks sparse after trimming, it might need more nitrogen; a side-dressing of compost or fish emulsion works wonders. Now go rescue that plant!
📚 In This Guide
- What you need
- Instructions
- Tips and common mistakes
- Wrapping up and next steps
What you need
- ● Scraggly mint plant – Any variety (e.g., peppermint, spearmint, or pineapple mint) with leggy, sparse, or overgrown stems.
- ● Sharp pruning shears or scissors – Clean, sterilized tools (rubbing alcohol works!) to avoid disease. Size: 4-6 inch blades for precision.
- ○ Gloves (optional but recommended) – Protects hands from mint’s oils, which can irritate skin. Type: Nitrile or latex-free for sensitive skin.
- ● Well-draining potting mix – Quantity: Enough to refresh the plant’s container (or a new 10-12 inch pot if repotting). Mix: 60% peat/coir, 30% perlite, 10% compost.
- ● Watering can with a fine rose nozzle – For gentle hydration post-trim. Capacity: 1-2 gallons.
- ● Plant food or liquid fertilizer – Type: Balanced 10-10-10 or organic fish emulsion (diluted to half-strength). When: Apply 1 week after trimming.
- ● Grow lights or sunny windowsill – Lighting: 6+ hours of bright, indirect light daily (south-facing window or LED grow lights).
- ● Mulch (e.g., straw or shredded leaves) – Purpose: Retains moisture and suppresses weeds in garden beds.
- ● Spray bottle with water – For misting leaves if humidity is low (ideal: 50-70% RH).
Step-by-Step instructions for revitalizing a scraggly mint plant
Here’s how I bring back bushy, vibrant mint—no fancy tools or complicated steps required.
✂️ Step 1: Assess and Prune the Leggy Growth
Start by examining your mint’s structure. Look for long, bare stems with sparse leaves—these are your targets. Use clean, sharp pruning shears (or even kitchen scissors) to cut back one-third of the plant’s height at a time. Focus on the leggy stems first, making cuts just above a set of leaves or a leaf node. This encourages new growth from those nodes.
Don’t trim randomly—I always cut at a 45-degree angle to prevent water from pooling on the stem, which could rot it. If your plant has flower stalks, snip those off immediately. Flowers signal the plant to focus on seed production instead of leaf growth, so removing them keeps the energy in the foliage where you want it.
🌿 Step 2: Thin Out Crowded Stems for Airflow
Mint spreads aggressively, often creating a dense tangle of stems. Gently pull or cut out any stems that are rubbing against others or growing in a way that blocks sunlight from reaching the center. Aim to leave 3-4 strong stems per plant—this gives your mint room to breathe and prevents fungal issues like powdery mildew.
Here’s the thing—if your plant looks like a tangled mess, don’t force it. Instead, work in sections. Start with the outermost stems and move inward. You’ll see new shoots emerging from the base within 2-3 weeks if the roots are still healthy. If you’re unsure whether a stem is alive, gently tug it—if it resists, it’s still viable.
💧 Step 3: Adjust Watering and Fertilize Lightly
After pruning, your mint will need consistent moisture to recover. Water deeply once a week, letting the soil dry out slightly between waterings. Mint hates soggy roots, so ensure your pot has drainage holes. If you’re growing in the ground, check the soil 1 inch below the surface—it should feel slightly damp but not wet.
Give your mint a balanced liquid fertilizer (like a 10-10-10 mix) diluted to half strength. Apply it once a month during the growing season. Over-fertilizing can burn the roots, so less is more. Watch for new leaves emerging from the base—this is your sign that the plant is rebounding. If growth stalls after a few weeks, the soil might need a boost of compost.
☀️ Step 4: Optimize Light and Space for Recovery
Mint thrives in partial shade to full sun, but scraggly plants often suffer from too much shade or poor air circulation. Move your pot to a spot where it gets 4-6 hours of morning sun and afternoon shade, especially in hot climates. If you’re growing indoors, place it near a bright window or under a grow light for 12-14 hours a day. Leggy growth usually means the plant is stretching for light.
If your mint is in a container, consider repotting it into a slightly larger pot (just 1-2 inches wider) to give the roots more room to spread. Fresh potting mix will provide nutrients and improve drainage. Real talk: Mint is hardy, but it won’t bounce back if it’s root-bound or starved for space. After repotting, hold off on heavy watering for 3-4 days to let the roots adjust.
Tips & tricks for revitalizing ragged mint growth
Here’s what nobody tells you about bringing back your mint—these tricks turn scraggly into lush in no time.
Pruning Precision: When cutting back that one-third of the plant’s height in Step 1, focus on the oldest stems first. These are usually the ones with fewer leaves and longer gaps. I learned this the hard way after trimming too many young stems—your mint needs those for energy to regrow. Make your cuts just above a leaf node (where leaves and stems meet) to encourage new shoots from that exact spot. Think of it like giving your plant a fresh start from its strongest points.
Flower Stalk Rescue: Those flower stalks might look harmless, but they’re mint’s way of saying, "I’m done growing leaves for now." Remove them immediately in Step 1, and don’t leave any behind—even small buds will drain energy from your foliage. For extra insurance, check your plant weekly during recovery. If you spot new flower buds forming, snip them off right away. This redirection of energy is what transforms your scraggly plant into a bushy powerhouse within weeks.
Airflow Strategy: In Step 2, when thinning those crowded stems, don’t just cut—pull gently to expose the center of the plant. This isn’t just about looks; proper airflow prevents fungal diseases like powdery mildew, which thrive in damp, enclosed spaces. I’ve seen mint plants go from healthy to sad in days when airflow was neglected. Aim for that 3-4 strong stems target, and if your plant is particularly dense, consider spreading the remaining stems outward rather than keeping them clustered.
Light Optimization: The 4-6 hours of morning sun in Step 4 is your sweet spot—it prevents leaf scorch while giving your mint enough energy to regrow. If you’re growing indoors, a south-facing window provides the best natural light. For grow lights, position them 6-12 inches above the plant and keep them on for those 12-14 hours daily. Pro tip: Rotate your pot every few days so all sides get even light exposure. Uneven growth is a dead giveaway that your mint isn’t getting consistent light.
Pro Tips for Scraggly Mint Plant
- Here’s what nobody tells you about bringing back your mint—these tricks turn scraggly into lush in no time.
- Pruning Precision: When cutting back that one-third of the plant’s height in Step 1, focus on the oldest stems first.
- Flower Stalk Rescue: Those flower stalks might look harmless, but they’re mint’s way of saying, "I’m done growing leaves for now."
Frequently asked questions
Got questions about your scraggly mint plant?
You’re not alone! Here are some of the most common concerns—and quick fixes—to help your mint bounce back to lush, vibrant growth.
Why does my mint plant look so scraggly and leggy?
Mint grows tall and sparse when it’s not getting enough light. If your plant is stretching toward a window or looking bare at the bottom, it’s likely etiolating (a fancy term for light-starved growth). Move it to a spot with 4–6 hours of direct sunlight daily—or supplement with a grow light. Overcrowding or poor soil can also contribute, so check for root-bound roots or compacted soil.
How often should I trim scraggly mint to encourage bushier growth?
Trim your mint every 4–6 weeks to promote fuller growth. Focus on cutting back one-third of the leggiest stems just above a set of leaves (not bare stems). This encourages branching and prevents the plant from becoming too woody. Pro tip: If your mint is flowering, snip those blooms ASAP—they sap energy from leaf growth!
Can I revive a severely scraggly mint plant, or should I start over?
Don’t toss it yet! Even a very scraggly mint can recover with the right care. Start by pruning back by half to remove dead or weak stems, then repot it in fresh, well-draining soil. Boost its health with a balanced liquid fertilizer (like 10-10-10) and ensure it gets bright, indirect light. If the roots are mushy or rotting, you may need to propagate cuttings instead.
What’s the best way to propagate scraggly mint to get more plants?
Propagating is easy! Snip 4–6 inch healthy stems (with at least 2–3 leaf nodes) from your scraggly plant and remove the lower leaves. Place the cuttings in water or moist potting mix, ensuring the nodes are submerged. Roots should appear in 1–2 weeks. Once rooted, transplant to soil and keep them in bright, indirect light until established.
Is scraggly mint still safe to use for cooking or tea?
Yes! Even if your mint looks scraggly, the leaves are still flavorful and safe to use. Just wash them thoroughly to remove dust or pests. For the best flavor, harvest leaves from the top third of the plant (where they’re freshest). If your mint has yellow or wilted leaves, skip those—they can taste bitter or off. Store harvested leaves in the fridge for up to 1 week or dry them for long-term use.
Still stumped? Drop your mint’s specific issues in the comments—we’re happy to help troubleshoot!
Wrapping up and next steps
Your scraggly mint plant doesn’t have to stay that way! With just a few simple trims and a little TLC, you can coax it back to lush, vibrant growth. Remember, regular pruning keeps mint bushy and healthy, while proper care ensures it thrives year after year. 🌿
Ready to give your mint a fresh start? Grab your shears and get trimming—your garden (and future mojitos 🍹) will thank you!
- Next step: Schedule a quick trim every 4-6 weeks to maintain its shape and encourage new growth.