
Planting
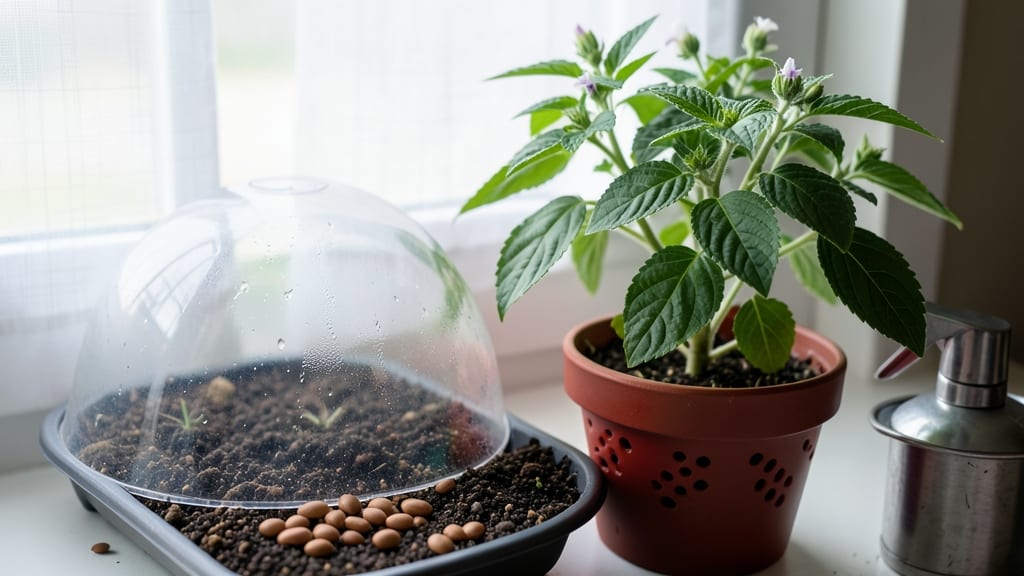
Planting holy basil seeds starts with the right timing—wait until after your last frost when soil stays above 70°F for consistent germination. 🌱 I learned the hard way that rushing seeds in cooler soil leads to weak sprouts or no growth at all.
The key is patience and preparation: holy basil seeds need warmth, moisture, and just enough light to break through the soil without drying out.
You’ll need a shallow tray or small pots with well-draining soil mix—think 50% potting soil and 50% perlite or vermiculite to prevent rot. Plant seeds just ¼-inch deep and space them 2 inches apart to avoid overcrowding later.
Water gently until the soil feels damp (not soggy), then cover the tray with plastic wrap to trap humidity. This creates the tropical environment holy basil craves.
Within 7-14 days, you’ll see those first tiny leaves unfurl—this is where the magic happens. Keep the soil consistently moist (not waterlogged) and move the tray to a bright spot with 6-8 hours of indirect light daily.
Once seedlings have 2-3 true leaves, thin them to 12 inches apart or transplant to individual pots. The goal? Strong, lush plants ready for harvest in just 6-8 weeks.
Common mistakes to avoid: overwatering (which drowns seeds) or letting the soil dry out (which kills germination). Holy basil also hates cold drafts—keep it warm and consistent. Once established, these plants thrive in containers or gardens, offering fragrant leaves for tea or cooking. Ready to grow yours?
📚 In This Guide
- What you need
- Instructions
- Tips and common mistakes
- Wrapping up and next steps
What you need
- ● Holy basil seeds: 10–20 seeds (organic, non-GMO preferred for best results).
- ● Seed-starting mix: 1–2 cups of well-draining, sterile potting soil (or coconut coir for organic options).
- ● Containers: Small pots (3–4 inches deep) with drainage holes, or
- ● A seed tray with individual cells (for better organization).
- ● Watering can or spray bottle: With a fine mist setting (to avoid disturbing seeds).
- ● Plastic wrap or humidity dome: To retain moisture during germination.
- ● Grow lights or sunny windowsill: Holy basil thrives in 6–8 hours of direct sunlight daily.
- ○ Fertilizer (optional but helpful): A balanced liquid fertilizer (5-5-5 or 10-10-10) diluted to half-strength, or
- ● Compost tea for organic growth.
- ● Temperature: 70–85°F (21–29°C) for germination; 65–75°F (18–24°C) afterward.
- ● Humidity: 60–70% (use a humidity tray if your home is dry).
- ● pH level: Slightly acidic to neutral soil (6.0–7.0).
- ● Soak seeds overnight: Place seeds in warm water for 4–6 hours to soften the outer shell and speed up germination. 💡
- ● Label your pots: Holy basil varieties (like Tulsi) can look similar—use tags to track growth! ✨
- ● Transplant carefully: Once seedlings have 2–3 true leaves, harden them off before moving to larger pots or garden beds.
Step-by-step instructions for planting holy basil seeds
Here’s how I get holy basil seeds to sprout quickly and grow into lush, aromatic plants—no guesswork involved.
🌱 Step 1: Pre-Soak Seeds for Faster Germination
Holy basil seeds have a tough outer coating that slows sprouting. To break it down, place them in a small bowl of lukewarm water for 12-24 hours. You’ll see the water turn slightly cloudy as the seeds absorb moisture and soften. This step cuts germination time in half—from 2-3 weeks to just 7-10 days.
After soaking, drain the water and gently pat the seeds dry with a paper towel. This prevents mold while keeping them hydrated enough to germinate quickly. I like to soak them overnight, then plant them first thing in the morning for the best results.
💧 Step 2: Prepare Containers and Seed Starting Mix
Use small pots or seed trays with drainage holes to prevent root rot. Fill them with a lightweight seed-starting mix—never garden soil, as it’s too dense and can harbor fungi. Moisten the mix until it’s damp but not soggy, like a wrung-out sponge. Press it down lightly to remove air pockets, then create shallow furrows about ¼ inch deep with your finger.
Holy basil seeds are tiny, so I use a toothpick to space them ½ inch apart in the furrows. Cover them with a thin layer of mix—just enough to obscure the seeds. Gently mist the surface with water until the top layer feels evenly moist. Overwatering now will suffocate the seeds before they sprout.
☀️ Step 3: Provide Warmth and Humidity for Germination
Place the containers in a warm spot, ideally between 75-85°F. A seedling heat mat works wonders if your home runs cooler. Cover the pots with a clear plastic dome or plastic wrap to trap humidity—holy basil seeds need consistent moisture to break through their tough shells.
Check the soil daily and mist the surface if it feels dry to the touch. Avoid lifting the cover to peek; every time you remove it, you release moisture and cool the soil. Once you see 50% of seeds sprouting (usually 5-7 days after planting), remove the cover immediately to prevent damping-off disease.
🌿 Step 4: Move to Bright, Indirect Light
The moment seedlings emerge, place them under bright, indirect light. A south-facing window works, but direct sun can scorch tender leaves. If using grow lights, position them 2-3 inches above the seedlings and keep them on for 14-16 hours daily. You’ll know the light is right when seedlings grow straight and sturdy, not leggy or stretched.
When the first true leaves (the second set after the initial seed leaves) appear, thin the seedlings to the strongest one per pot. Use small scissors to snip the weaker stems at soil level—this prevents competition for nutrients. Holy basil is sensitive to root disturbance, so handle seedlings gently during thinning.
⏰ Step 5: Transplant and Maintain for Lush Growth
Once seedlings have 4-6 true leaves and are about 3 inches tall (usually 4-6 weeks after planting), transplant them into individual 4-inch pots with fresh potting mix. Holy basil thrives in well-draining soil with a slightly acidic to neutral pH. Water thoroughly after transplanting to help roots settle.
Keep the soil consistently moist but never soggy—holy basil wilts easily when overwatered. After transplanting, place the pots in bright, indirect light for a week to reduce stress. Gradually introduce them to morning sun over the next two weeks to harden them off. You’ll see new growth within 10-14 days, signaling they’ve adapted successfully.
Tips & tricks for perfect holy basil seed germination
These little-known tricks will help you bypass the common pitfalls of growing holy basil from seeds—and get those sprouts popping in record time.
Soaking Strategy: For the 12-24 hour soak, I recommend using a glass bowl rather than plastic—it lets you easily monitor the water's cloudiness, which tells you the seeds are actively absorbing moisture. If you're short on time, the minimum effective soak is 12 hours, but don't go under that or you risk incomplete seed softening. After soaking, I've found that wrapping the seeds in a damp paper towel inside a sealed container overnight (rather than air-drying) maintains just the right moisture level for planting the next morning.
Container Selection: While small pots work, I've had the most success with clear plastic seedling trays—they let you monitor moisture levels and root development without disturbing the seeds. If using pots, make sure they have drainage holes and are no deeper than 3 inches, as holy basil doesn't need much root space initially. Pro tip: Place a small piece of mesh or hardware cloth over drainage holes to prevent soil from washing out while still allowing excess water to escape.
Heat Hack: The 75-85°F range is critical, but most homes don't maintain that consistently. I keep my seed trays on top of my refrigerator (which stays around 80°F) during the day and move them to a warm spot near my kitchen during cooler evenings. If you don't have a warm spot, a simple DIY solution is to place the trays inside a closed cardboard box lined with aluminum foil—this creates a mini greenhouse effect that retains warmth. Just remember to check moisture levels daily since the enclosed space will slow evaporation.
Thinning Technique: When thinning to the strongest seedling per pot in Step 4, I use a pair of clean, sharp scissors to cut stems at soil level rather than pulling. This prevents disturbing the roots of the remaining seedling. Another trick: If you're unsure which seedling is strongest, wait until you see the first true leaves appear—this makes it much easier to identify the healthiest plant. Once you've thinned, give the remaining seedling a gentle mist with water to help it recover from the stress.
Pro Tips for Plant Holy Basil Seeds
- These little-known tricks will help you bypass the common pitfalls of growing holy basil from seeds—and get those spr...
- Soaking Strategy: For the 12-24 hour soak, I recommend using a glass bowl rather than plastic—it lets you easily moni...
- Container Selection: While small pots work, I've had the most success with clear plastic seedling trays—they let you ...
Frequently asked questions
about planting holy basil seeds—because even the greenest thumbs need a little guidance! Here are answers to the most common queries to help you grow thriving plants with confidence.How long does it take for holy basil seeds to germinate?
Holy basil seeds typically sprout within 7–14 days under ideal conditions (warmth, moisture, and indirect light). If you’re impatient, try soaking seeds in water for 6–12 hours before planting—this can speed up germination by 2–3 days. Pro tip: Keep the soil consistently moist (not soggy) to avoid mold.
Can I plant holy basil seeds directly outside, or should I start indoors?
For best results, start seeds indoors 8–12 weeks before your last frost date (holy basil is frost-sensitive!). If you live in a warm climate, you can direct-sow seeds after the soil reaches 70°F+, but seedlings are more vulnerable to pests and temperature swings outdoors. Use seed trays or small pots for easy transplanting.
Why aren’t my holy basil seeds sprouting? Troubleshooting tips!
If your seeds refuse to sprout, check these common culprits:
- Cold soil: Holy basil needs warmth (70–85°F) to germinate. Use a heating mat if your home runs cool.
- Too much water: Overwatering suffocates seeds. Let the top inch of soil dry slightly between waterings.
- Old seeds: Seeds lose viability after 1–2 years. Test a few in a damp paper towel to confirm viability.
- Low light: Place trays near a sunny window or under grow lights (12+ hours/day).
Do I need to use special soil for holy basil seeds?
Holy basil thrives in well-draining, slightly acidic soil (pH 6.0–7.0). A mix of 50% potting soil + 50% perlite or coconut coir works perfectly. Avoid heavy garden soil—it can compact and suffocate roots. For containers, ensure drainage holes are present to prevent root rot.
Can I grow holy basil from cuttings instead of seeds?
Cuttings root faster and retain the parent plant’s traits
. Snip a 3–4 inch stem just below a leaf node, remove lower leaves, and place it in water or moist soil. Roots should appear in 1–2 weeks. This method is ideal if you want to propagate a specific variety (like Tulsi or Sriphala) or skip the germination wait.
Wrapping up and next steps
Growing holy basil from seeds is a rewarding journey—one that brings you closer to nature while reaping the benefits of this sacred herb! 🌱 By following the right germination tricks, providing the ideal conditions, and a little patience, you’ll soon enjoy a thriving plant with fragrant leaves.
Whether you’re cultivating it for its spiritual significance or culinary uses, your hard work will pay off in lush, healthy growth.
Now that you’re armed with the know-how, take the next step: grab your seeds, prepare your space, and start planting! Keep an eye on your little sprouts, and soon, you’ll be harvesting fresh holy basil to share with friends or use in your favorite recipes. Happy gardening! 🌿✨