
Planting
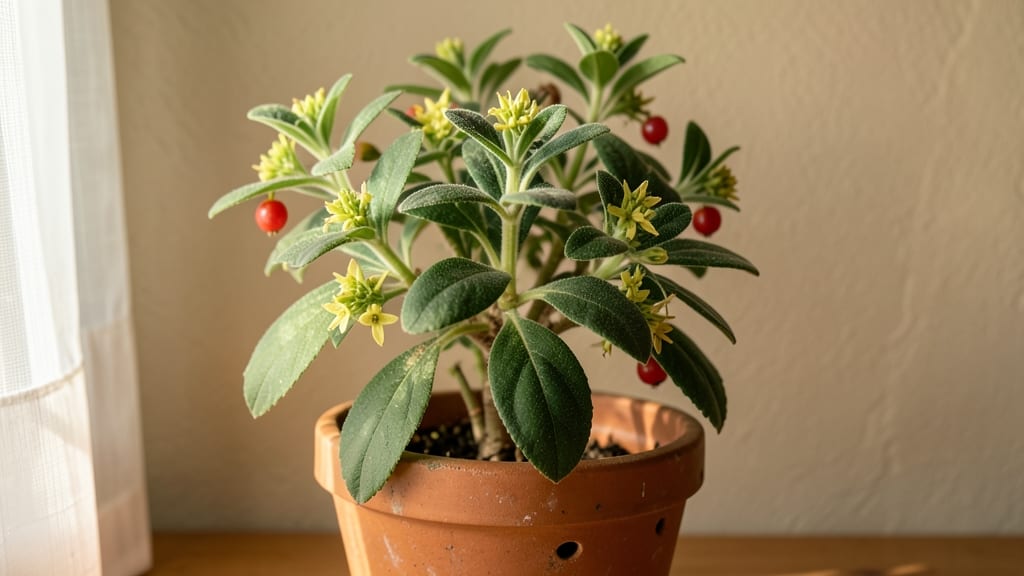
Growing ashwagandha in pots transforms your indoor space into a mini apothecary. 🌿 This adaptable plant thrives with just a few hours of indirect light—perfect for windowsills or shelves where sunlight is scarce.
My first attempt nearly died from overwatering, but once I got the rhythm right, it became my most resilient houseplant.
The secret lies in mimicking its natural desert habitat: well-draining soil, infrequent watering, and a pot with drainage holes. A 6-inch diameter container works for starters, and you’ll need a mix of potting soil and perlite to prevent soggy roots.
Ashwagandha’s small, oval leaves signal health, while yellowing or wilting means it’s time to adjust your care routine.
Within 3-4 months, you’ll see bushy growth and delicate yellow flowers—a sign your plant is happy. The real magic? Its roots contain adaptogenic compounds, though you’d need to harvest and dry them for medicinal use. For now, just enjoy watching it grow into a lush, low-maintenance companion.
Even in low-light apartments, this plant rewards patience. The key is consistency: water when the top inch of soil feels dry, and rotate the pot occasionally for even growth. No pesticides needed—its tough nature keeps pests at bay. Ready to try?
📚 In This Guide
- What you need
- Instructions
- Tips and common mistakes
- Wrapping up and next steps
What you need
- ● Ashwagandha seeds or seedlings: 2–3 (ensure they’re organic or disease-free for best results).
- ● Pot: 1 medium-sized (6–8 inches deep) with drainage holes. Terracotta or clay pots work best!
- ● Well-draining potting mix: 2–3 gallons of a blend like: 60% coco coir or peat moss
- ● 30% perlite or vermiculite (for aeration)
- ● 10% compost or worm castings (for nutrients)
- ● Drainage layer: Small pebbles, gravel, or broken pottery shards (1–2 inches thick).
- ● Watering can or spray bottle: With a fine rose attachment for gentle hydration.
- ● Grow lights: LED or fluorescent (12–14 hours/day) if natural light is <12 hours/day.
- ● Fertilizer: Balanced liquid fertilizer (5-5-5 NPK) or organic options like fish emulsion.
- ● Humidity tray: A shallow tray with pebbles and water to boost moisture in dry climates.
- ● Pruning shears: Small, sharp pair for trimming leggy stems later.
- ● pH testing kit: To check soil pH (ideal range: 5.5–7.0 for ashwagandha).
Step-by-Step guide to growing ashwagandha in pots indoors
Here's how to cultivate this adaptogenic herb successfully with minimal sunlight—no greenhouse required.
🪴 Step 1: Select the Right Container and Soil Mix
Choose a 6-8 inch diameter pot with drainage holes—ashwagandha roots need airflow and hate soggy conditions. I prefer terracotta because it wicks away excess moisture naturally. The soil should be well-draining yet moisture-retentive, so blend 50% potting mix with 50% perlite or coconut coir for aeration.
Fill the pot to 1 inch below the rim and tap gently to settle the mix. Pre-moisten with lukewarm water until evenly damp but not dripping. Ashwagandha prefers slightly acidic soil (pH 6.0-7.0), so test your mix with a kit if possible. Real talk: I’ve seen beginners overwater because they assume this drought-tolerant plant needs constant moisture—it doesn’t.
🌱 Step 2: Plant Seeds or Transplants Correctly
For seeds, plant ¼ inch deep—they’re tiny, so use a toothpick to create holes. Sow 2-3 seeds per pot and space them 1 inch apart. Cover lightly with additional mix and mist gently with water. Keep the soil consistently moist (not wet) until germination, which takes 10-20 days at 70-75°F. You’ll see first true leaves emerge in pairs, signaling healthy growth.
If using transplants, dig a hole twice as wide as the root ball and place the plant so the top of the root ball sits ½ inch below the soil line. Gently firm soil around the base to eliminate air pockets. Here’s the thing—ashwagandha roots are sensitive, so avoid disturbing them during transplanting. Water thoroughly after planting to help settle the soil.
☀️ Step 3: Position for Optimal Light and Humidity
Place your pot in bright, indirect light—ashwagandha thrives in 4-6 hours of morning sun or under a grow light (12-14 hours daily). A north-facing window works best, but if your space is dimmer, supplement with a full-spectrum LED. You’ll notice leggy growth if light is insufficient—this means the plant is stretching toward any available source.
Maintain 50-60% humidity by placing the pot on a tray of pebbles with water (ensure the pot isn’t sitting in water). Mist leaves 2-3 times weekly to mimic its native tropical conditions. I keep a small humidifier nearby during dry winter months—ashwagandha’s leaves yellow if humidity drops below 40%, and that’s a clear signal to adjust.
💧 Step 4: Water and Fertilize for Healthy Growth
Water when the top inch of soil feels dry—ashwagandha’s roots are shallow, so check daily in warm weather. Use room-temperature water and avoid wetting leaves to prevent fungal issues. I water from the bottom occasionally to encourage stronger root development: place the pot in a saucer of water for 10 minutes, then drain excess.
Fertilize every 4-6 weeks with a balanced, water-soluble fertilizer (10-10-10) diluted to half-strength. Over-fertilizing causes salt buildup, which burns roots. You’ll see dark green, glossy leaves as a sign your plant is thriving. If leaves yellow between veins, it’s a classic sign of overwatering—let the soil dry out more between waterings.
✂️ Step 5: Prune and Harvest for Continued Vigor
Pinch back leggy stems to encourage bushier growth, focusing on new shoots that appear near the base. Use clean scissors to cut just above a leaf node—this prevents disease and promotes branching. Ashwagandha flowers indoors, but removing blooms redirects energy to leaf production, which is where the medicinal compounds concentrate.
Harvest leaves when they’re 3-4 inches long for peak potency. Snip individual leaves with scissors or pinch them off by hand. For roots, wait until the plant is 12-18 months old—dig carefully, rinse, and dry in a dark, airy space. Real talk: I’ve seen beginners harvest too early, sacrificing yield for impatience. Patience here pays off with stronger roots.
Tips & tricks for growing thriving ashwagandha indoors
Between us, these small details make all the difference when growing ashwagandha in limited light.
Container Selection: If you're using plastic pots, add an extra drainage hole—ashwagandha roots are sensitive to waterlogging. I've found that terracotta pots actually help regulate moisture better than plastic, especially during those 10-minute bottom-watering sessions mentioned in Step 4. The key is airflow at the roots while maintaining moisture retention in the mix.
Germination Boost: For seeds that take longer than the 10-20 day window to germinate, try soaking them in lukewarm water for 4-6 hours before planting. This mimics natural rainfall and can trigger germination faster. Just remember to plant them immediately after soaking—they'll be ready to sprout! The 70-75°F temperature range is critical here, so if your home runs cooler, consider using a seedling heat mat.
Light Optimization: When using grow lights for the required 12-14 hours daily, position them 6-8 inches above the plant. Too close causes leaf burn, too far makes them stretch. I've noticed ashwagandha responds best to lights that simulate natural daylight cycles—turn them on at dawn and off at dusk for best results. The 4-6 hours of morning sun mentioned in Step 3 is particularly important for photosynthesis efficiency.
Pruning Technique: When pinching back leggy stems in Step 5, aim for the topmost set of leaves—this encourages branching at the base. I've found that using clean, sharp scissors (disinfected with rubbing alcohol) prevents disease transmission between cuts. The goal is to maintain that bushy growth pattern while keeping the plant's energy focused on leaf production rather than flowering.
Pro Tips for Ashwagandha Plant In Pot
- Between us, these small details make all the difference when growing ashwagandha in limited light.
- Container Selection: If you're using plastic pots, add an extra drainage hole—ashwagandha roots are sensitive to waterlogging.
- Germination Boost: For seeds that take longer than the 10-20 day window to germinate, try soaking them in lukewarm water for 4-6 hours before planting.
Frequently asked questions
Got questions about growing ashwagandha in pots?
You’re not alone! Here are answers to the most common queries—from sunlight struggles to harvest tips—so you can nurture your plant like a pro.
Can ashwagandha grow in low-light conditions?
Yes! Ashwagandha thrives in bright, indirect light but can tolerate low-light spots (like north-facing windows or grow lights). Just expect slower growth—aim for at least 4–6 hours of filtered light daily. If leaves yellow, it’s begging for more brightness!
How often should I water my potted ashwagandha?
Water when the top 1–2 inches of soil feel dry (about once a week, adjusting for humidity). Overwatering is the #1 killer—use pots with drainage holes and avoid soggy soil. Pro tip: Stick your finger in the soil; if it’s damp, wait!
What’s the best soil mix for ashwagandha in pots?
Use a well-draining, slightly sandy mix (e.g., cactus/succulent soil + perlite). Ashwagandha hates soggy roots! Add a 1-inch layer of gravel at the pot’s bottom to prevent waterlogging. Bonus: A splash of compost boosts nutrients without compacting soil.
How long does it take for ashwagandha to grow in a pot?
Seedlings sprout in 2–4 weeks, but full maturity (ready for harvest) takes 6–12 months. Patience pays off! If growth stalls, check light, water, and pot size—ashwagandha needs room to spread (repot every 2 years).
What if my ashwagandha leaves turn yellow?
Yellow leaves usually mean overwatering or poor drainage. Let the soil dry out, trim dead leaves, and ensure your pot has holes. Underwatering? Check for crispy edges and adjust your watering schedule. Pest check: Inspect for aphids or fungus gnats!
Can I grow ashwagandha indoors year-round?
Ashwagandha is a tropical perennial—it loves indoor warmth (60–80°F). Just keep it away from drafts (like AC vents) and supplement with grow lights in winter if natural light fades. No hibernation needed!
Wrapping up and next steps
Growing ashwagandha in pots is a rewarding journey—even with minimal sunlight! This adaptable plant thrives indoors, offering stress-relieving benefits right at your fingertips. Whether you’re a beginner or a seasoned plant parent, its low-maintenance nature makes it the perfect addition to your green space.
Ready to take the next step? Start with a small pot, monitor its progress, and soon, you’ll be harvesting your own ashwagandha for wellness or gardening pride. 🌱✨ Your future self—and your plants—will thank you!